| Login Company 1-949-236-6510 | |
|
|
|
|
||||||
Microsoft deprecated BinaryFormatter in .NET 8. If you target .NET 8, you may have ignore warnings. However, we are aware that .NET 9 absolutely refuses to allow BinaryFormatter, upon which several components depend.
We are actively working to remove BinaryFormatter though this will result in a breaking change for certain TWAIN and ISIS classes taht allow you to load and save settings in their proprietary binary format. It will also remove the option to support binary saved AtalaAnnotaation or WangAnnotation objects.
There is not currently an ETA for this but it's being actively worked on.
So .NET 9 is NOT supported at this time (as of March 31, 2025)
This article was originally written for the first appearance of our .NET 5 dlls in 11.4. As of April 2025, it's being updated to use the current version 11.5.0.6. In theory, you can use earlier .NET (for 11.5, we ship with 6.0 dlls, so you can target .NET 6 / 7/ 8. However, since 8 is the minimum supported .NET from MS (6 and 7 no longer being suported) we are going to go with .NET 8.
DotImage 11.5 targets .NET 6.0 (our DLLs are built for .NET 6.0) and work with .NET 7 / 8 just fine
When 11.6 comes out we will likely retool for .NET 8 and up because .NET 6 is past end of support
DotImage 11.4 shipped with .NET 5.0 DLLs which worked (and do work with) .NET 5 / 6 / 7 / 8
The upshot of this is that if you are on an older version, you'll likely be able to target the newer ones, but officially speaking when MS ends support of a given .NET or .NET Framework, we end official support for it as well. We won't force an update, but if you were using 11.4 with our 5.0 DLLs targeting .NET 5.0 and ran into a problem that was fixed in 11.5, you will have to move to .NET 6+ or to use 11.5 to access the fix - we can not patch or back port.
Before we get started, it's important to note that this document is focusing only on the aspects of getting started with WDV in the context of ASP.NET Core web applications. We will discuss the differences between WDV / WDT in ASP.NET Core and standard ASP.NET, but we won't go into strenuous details about WDV and some of the more advanced things you can do with it.
This is because there is very little functional difference between WDV/WDT in ASP.NET Core versus ASP.NET. Herein we hope to give you the fundamentals you need to operate within the ASP.NET Core paradigm, and give you the tools to understand how to hook into the server side events and add server side code, but once you understand how to hook in / the analogy to what we call the "handler" in the ASP.NET version, Any of the implementation details are pretty much the same.
All of this means that you may want to have a look at our related papers/articles:
When creating a new application using the WebDocumentViewer, there are a few steps you will need in order to get the project up and running.
We will use this document to discuss the requirements of using the WebDocumentViewer within the context of an ASP.NET Core web application targeting the .NET framework, and then walk through its creation, step by step.
It is important to note that as of this article rewrite in April 2025, .NET 8 is the minimum supported and this article is being retooled for .NET 8 using the current 11.5.0.6
Note that if you're using WingScan web capture, you must use at least 11.4.0.5 as Google Chrome made changes to the Chromium engine that is used in both Chrome and MS Edge Chromium which will not work with WingScan < 11.4.0.5
The reason our 11.4.x DLLs are labeled 5.0 is that our .NET 5�DLLs work for both .NET 5 and .NET 6 - however, Microsoft has end of life-end of supported .NET 5, thus we will be using our SDK to target and support .NET 6 in this instance. Our 11.5�DLLs ship as 6.0 and work in .NET 6 and .NET 8 (but not .NET 9+ currently - we're working on this - please check in on the related KB on support for the various flavors of .NET
This document and our SDK assume that you're a developer familiar with basic use of Visual Studio, IIS Express or IIS, and general web application development practices using MS Visual Studio 2022 or later. The samples will be using an HTML 5 approach in an "Empty" (Minimal) ASP .NET Core web application targeting.NET Core 6.0 targeting 64 bit application pool and using Visual Studio's built in IIS Express web server.
To ensure you're using the x64 version of IISExpress, in Visual Studio, go to Tools -> Options and then in the options menu, navigate to Projects and Solutions -> Web Projects and ensure the "Use the 64 bit version of IIS Express for web sites and projects" option is checked.

NOTE: There is no major difference in using our control in MVC vs non-MVC apps - the only practical differences are that MVC likes to put scripts and css in specific locations and uses a slightly different means of interpolating paths in includes. All of this information should be able to be applied in an MVC app - just make sure you put all the markup on a single ASPX view
We will be providing examples in C#. Our SDK works with VB.NET as well, but for the sake of simplicity any .NET code will be provided in C#. You can use a converter tool such as Telerik Code converter to convert examples to VB.NET.
The WebDocumentViewer also requires jQuery, jQueryUI, and Raphael
Our SDK ships with the minimum version of all required libraries.. our .NET8 sample here is going to make use of our published packages (we may actually show options for the deprecated bower as well as using npm packages and manual adding of resources). It IS possible to update to newer versions if you like.. but whatever you choose, you should be aware of the MINIMUM required.
On installing our SDK, the scripts will be delivered to they are placed in:
C:\Program Files (x86)\Atalasoft\DotImage 11.5\bin\WebResources\WebDocViewer
As of 11.5.0.5, these are:
IMPORTANT jQueryUI is 1.14.0 as of 11.5.0.5 - prior to that it was 1.13.1
A brief set of instructions for downloading our SDK and activating a license will be given, but the rest of the document assumes you've installed the latest DotImage SDK (currently 11.5.0.6 as of April, 2025)
We do not currently provide access for our ASP.NET Core web components directly in the SDK install, so this tutorial will be using our NuGet packages.
If you're a licensed developer, or are actively evaluating our SDK and run into problems/questions, you are welcome to contact support. You can make a support case in writing at our support portal. You may also call in to support during our normal business hours Support Hours: M - F from 8AM - 5PM EDT (New York Time)
Call us: +1 (949) 236-6510
Web applications with WebDocumentViewer / WebDocumentThumbnailer have a lot of "moving parts" and troubleshooting can seem a daunting task.
There is a free third party tool that can greatly enhance troubleshooting and assist you in reporting issues to support
If you are having issues with WebDocumentViewer, problems related to the web components are best diagnosed by looking at a log of the network traffic. Most commonly a faulting application will clearly show a 500 internal server error being thrown and the full response body of that error will offer a great deal of insight into the root cause (licensing issues, and errors in the WebDocumentRequestHandler will most often show up in the 500 error response body)
We recommend Fiddler if you need to collect a log and report it to support.
Please download, install, and run Fiddler web logging
Use it to collect a log while you reproduce the issue, then save the log as a native .saz file and and attach it to your support case as a file attachment/ (please do not save as CSV or text log. The native SAZ file gives us much better access to the tools we need to help diagnose your issue)
PLEASE NOTE: you need to capture a session while NOT using SSL/HTTPS. Fiddler logs cannot see into HTTPS without enabling a special certificate which we do not recommend.. if your capture is of an HTTPS session we will not get useful diagnostic information from the log
You may have already installed our SDK from the download site latest version of Atalasoft DotImage SDK, and activated a paid or eval license. If so that's fine. The licensing can be done using our licensing component NuGet package...
NOTE: The current version is 11.5.0.6 as of May 2025. updates of the SDK happen with regularity. We work hard not to make breaking changes so this guide should be compatible with future releases. We will update the specific technical details as needed as changes arise
If you have not done so, please log in or create an account with Atalasoft so that you can activate our SDK.
Please note: the following is from our older document using VS2017 - we have not yet had a chance to update the screenshots etc.. but please do this in VS2022 - there have been some reports that the activation wizard won't install properly as a visual studio extension in VS2022. If you run into issues you can use the standalone activation wiz mentioned in the following KB: HOWTO: Activate DotImage SDK or Server (Including Offline Activation)


There should now be an "Activate DotImage" option under your Tools option in Visual Studio...

If you have SDK serials for DotImage and/or WingScan use the "Activate an SDK serial for use on this machine or a server license" option and activate your serials for version 11.5
If you do not yet have licenses, you can select the "request 30 day evaluation"
If you run into issues activating or require assistance, please contact support
NOTE for IIS users: The licensing above should be sufficient if you're using the built in web server in Visual Studio (IIS Express.. which this document assumes you are doing) but if you are using a local copy of IIS, then the IIS process does not run as your user name so it will not pick up your licenses. You'll need to take the extra step of copying your licenses into the application bin directory.
Assuming you have an app named�WdvDotNet8 hosted in IIS under:
c:\inetpub\wwwroot\WdvDotNet8\
Then you'd copy your licenses from:
C:\users\YOUR_USERNAME\AppData\Local\Atalasoft\DotImage 11.5\
to
c:\inetpub\wwwroot\WdvDotNet8\bin\
We're going to be creating a very minimal WebDocumentViewer (WDV) based application which will also make use of our WebDocumentThumbnailer (WDT).
While this may seem not too useful, it's the fundamental minimum you need to get the WDV running with ASP.NET Core. Don't worry, you can easily get more fancy (we have other documents and whitepapers that go into more advanced use cases), but this tutorial will give you the basic hooks to see how to get it running. For now, we're going to start with the basics.
The first step assumes you've licensed yourself as instructed above or by installing the SDK and running the license wizard to either request a 30 day evaluation or activate paid license for DotImage Document Imaging.
We will be using Visual Studio 2022. You can use later versions of Visual Studio (as available), however for the purpose of this project, 2022 is the platform we will be following. From there, you will create a new Empty ASP.NET Core� Project. Lets also target .NET 8 as our target framework, since it is the minimum version that this particular use case can support.
Please note that we are going through a specific minimal use case here. The choices made in the tutorial represent as "light a touch" as possible. For instance, please avoid the temptation to select "ASP.NET Core Web App (Model-View-Controller) or other. Once you've followed the tutorial successfully and "have a feel for the SDK and our .NET 8" then by all means, adapt it to your needs / redo but with MVC etc.


Install-Package Atalasoft.DotImage.WebControls.Core.x64This is also different from .NET Framework .. We must directly edit the project file to add a needed config option


<TargetFramework>net8.0</TargetFramework> to <TargetFramework>net8.0-windows</TargetFramework>UseWindowsForms true <UseWindowsForms>true</UseWindowsForms> <Project Sdk="Microsoft.NET.Sdk.Web">
<PropertyGroup>
<TargetFramework>net8.0-windows</TargetFramework>
<UseWindowsForms>true</UseWindowsForms>
<Nullable>enable</Nullable>
<ImplicitUsings>enable</ImplicitUsings>
</PropertyGroup>
<ItemGroup>
<PackageReference Include="Atalasoft.DotImage.WebControls.Core.x64" Version="11.5.0.6243" />
</ItemGroup>
</Project>net8.0-windows would benet6.0-windows above
This part is due to us starting with an empty project.. we need the wwwroot folder


We need to add the sample images we will be reading from

We need to set up a callback handler for the server side code for WDV. To do this, we add a new class named MyWdvCallbacks
Right click on the (wdvDotNet8) project and Add --> New Item
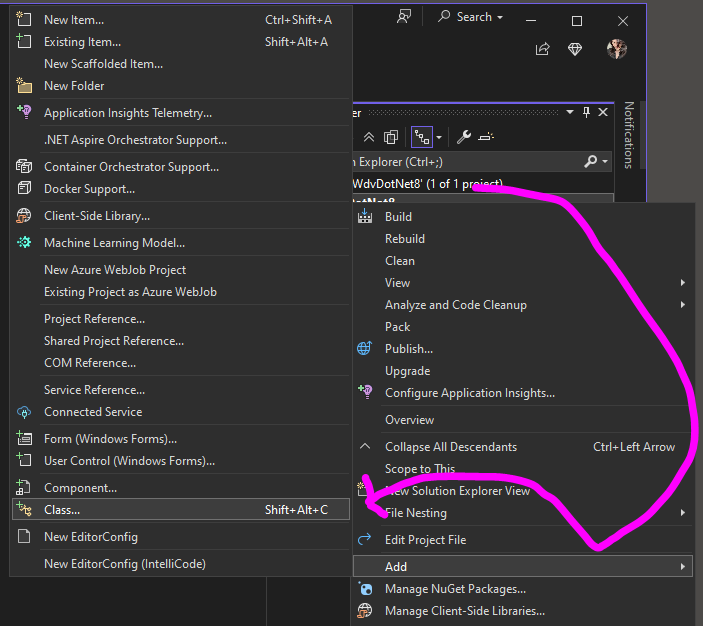
Select Class and name it MyWdvCallbacks.cs

Go to the new MyWdvCallbacks.cs class code and it will look like this:

Modify it to add the following at the top:
    using Atalasoft.Imaging.WebControls;
using Atalasoft.Imaging.WebControls.Core;MydvCallbacks to inherit from WebDocumentViewerCallbacks public class MyWdvCallbacks: WebDocumentViewerCallbacks
{
}MyWdvCallbacks: WebDocumentViewerCallbacks { cloture add: /// IMPORTANT: make sure you fully disable File Upload if you're not using it by adding this handler
public override void FileUpload(FileUploadEventArgs args)
{
args.Cancel = true;
base.FileUpload(args);
}
public override void DocumentInfoRequested(DocumentInfoRequestedEventArgs args)
{
Console.WriteLine("**********===DocumentInfoRequested===**********");
base.DocumentInfoRequested(args);
}
public override void ImageRequested(ImageRequestedEventArgs args)
{
Console.WriteLine("**********===ImageRequested===**********");
base.ImageRequested(args);
}
/*
* The above was just an example of hooking to the two main events.. you can handle any exposed event here
*
* //.. most common ...
* AnnotationDataRequested
* DocumentSave
* DocumentStreamWritten
* AnnotationStreamWritten
* //.. less common .
* PageTextRequested
* PdfFormRequested
* //.. rarely if ever used ..
* ReleaseDocumentStream
* ReleasePageStream
* ResolveDocumentUri
* ResolvePageUri
*/MyWdvCallbacks.cs file will look like this: using Atalasoft.Imaging.WebControls;
using Atalasoft.Imaging.WebControls.Core;
namespace WdvDotNet8
{
public class MyWdvCallbacks : WebDocumentViewerCallbacks
{
            /// IMPORTANT: make sure you fully disable File Upload if you're not using it by adding this handler
            public override void FileUpload(FileUploadEventArgs args)
            {
                args.Cancel = true;
                base.FileUpload(args);
            }
            public override void DocumentInfoRequested(DocumentInfoRequestedEventArgs args)
            {
                Console.WriteLine("**********===DocumentInfoRequested===**********");
                base.DocumentInfoRequested(args);
            }
            public override void ImageRequested(ImageRequestedEventArgs args)
            {
                Console.WriteLine("**********===ImageRequested===**********");
                base.ImageRequested(args);
            }
            /*
             * The above was just an example of hooking to the two main events.. you can handle any exposed event here
             *
             * //.. most common ...
             *  AnnotationDataRequested
             *  DocumentSave
             *  DocumentStreamWritten
             *  AnnotationStreamWritten
             *  //.. less common .
             *  PageTextRequested
             *  PdfFormRequested
             *  //.. rarely if ever used ..
             *  ReleaseDocumentStream
             *  ReleasePageStream
             *  ResolveDocumentUri
             *  ResolvePageUri
             */
}
}In previous ASP.NET Core, there was a startup.cs file that was used for "middleware". In .NET 8 , this is done in the program.cs instead.
The site created by Empty ASP .NET Core app template .NET 8 app uses the new minimal hosting model (only one Program.cs file is present in the project, Startup.cs file is absent). But at the same time, this is not a necessary condition and it is possible to use the same files as for previous versions of ASP .NET Core (see Use Startup with the new minimal hosting model). If, after all, a new approach is used, the combined Program.cs file for WDV app will look like:
The original program.cs from the blank project will look like this:

Before the line var builder = WebApplication.CreateBuilder(args);, add the following:
    using Atalasoft.Imaging.Codec;
    using Atalasoft.Imaging.Codec.Pdf;
    using Atalasoft.Imaging.WebControls.Core;

RegisteredDecoders.Decoders.Add(new PdfDecoder() { Resolution = 200, RenderSettings = new RenderSettings() { AnnotationSettings = AnnotationRenderSettings.RenderNone } });app.MapGet("/", () => "Hello World!"); and replace it with
    app.UseDefaultFiles();
    app.UseStaticFiles();

app.Map("/wdv", wdvApp => { wdvApp.RunWebDocumentViewerMiddleware(new WdvDotNet8.MyWdvCallbacks()); });Program.cs file will now look like this: using Atalasoft.Imaging.Codec;
using Atalasoft.Imaging.Codec.Pdf;
using Atalasoft.Imaging.WebControls.Core;
RegisteredDecoders.Decoders.Add(new PdfDecoder() { Resolution = 200, RenderSettings = new RenderSettings() { AnnotationSettings = AnnotationRenderSettings.RenderNone } });
var builder = WebApplication.CreateBuilder(args);
var app = builder.Build();
app.UseDefaultFiles();
app.UseStaticFiles();
app.Map("/wdv", wdvApp => { wdvApp.RunWebDocumentViewerMiddleware(new WdvDotNet8.MyWdvCallbacks()); });
app.Run();The setup for web document viewing just requires placing some JavaScript, CSS, and HTML into your page.


            <!-- Scripts for Web Viewing -->
            <script src="lib/WebDocViewer/jquery-3.5.1.min.js" type="text/javascript"></script>
            <script src="lib/WebDocViewer/Jquery-ui-1.14.0.min.js" type="text/javascript"></script>
            <script src="lib/WebDocViewer/raphael-min.js"></script>
            <script src="lib/WebDocViewer/clipboard.min.js"></script>
            <script src="lib/WebDocViewer/atalaWebDocumentViewer.js" type="text/javascript"></script>
            <!-- Style for Web Viewer -->
            <link href="lib/WebDocViewer/jquery-ui-1.14.0.min.css" rel="stylesheet" />
<link href="lib/WebDocViewer/atalaWebDocumentViewer.css" rel="stylesheet" /> <script type="text/javascript">
        var _viewer;
        var _thumbs;
        // Initialize Web Viewing
        $(function () {
            try {
                // Initialize Web Document Viewer
                _viewer = new Atalasoft.Controls.WebDocumentViewer({
                    parent: $('#_containerViewer'),
                    toolbarparent: $('#_toolbar1'),
                    serverurl: 'wdv',
                    allowannotations: true,
                    forcepagefit: true
                });
                _thumbs = new Atalasoft.Controls.WebDocumentThumbnailer({
                    parent: $('#_containerThumbs'),
                    serverurl: 'wdv',
                    allowannotations: true,
                    viewer: _viewer
                });
                loadFile();
            } catch (error) {
                appendStatus("Thrown error: " + error.description);
            }
        });
function loadFile() {
_thumbs.OpenUrl($('#FileSelectionList').val(), '');
}
// Show status and error messages
function appendStatus(msg) {
var stat = $("#status");
stat.append(msg + "<br>");
}
</script>
- Finally, we need to add in the html markup that will give us our viewer user interface and the open file selection boxes.
<h1>Atalasoft ASP.NET Core Web Viewing Sample</h1>
<form id="WDVForm" runat="server">
Select File to display:
<select ID="FileSelectionList" onchange="loadFile();">
<option value="images/Test.tif">Test.tif</option>
<option value="images/Test.pdf">Test.pdf</option>
</select>
<div style="width: 900px;">
<div id="_toolbar1"></div>
<div id="_containerThumbs" style="width: 180px; height: 600px; display: inline-block;"></div>
<div id="_containerViewer" style="width: 710px; height: 600px; display: inline-block;"></div>
</div>
<div id="status"></div>
</form> <!DOCTYPE html>
<html>
<head>
<meta charset="utf-8" />
<title></title>
<!-- Scripts for Web Viewing -->
<script src="lib/WebDocViewer/jquery-3.5.1.min.js" type="text/javascript"></script>
<script src="lib/WebDocViewer/jquery-ui-1.13.1.min.js" type="text/javascript"></script>
<script src="lib/WebDocViewer/raphael-min.js"></script>
<script src="lib/WebDocViewer/clipboard.min.js"></script>
<script src="lib/WebDocViewer/atalaWebDocumentViewer.js" type="text/javascript"></script>
<!-- Style for Web Viewer -->
<link href="lib/WebDocViewer/jquery-ui-1.13.1.min.css" rel="stylesheet" />
<link href="lib/WebDocViewer/atalaWebDocumentViewer.css" rel="stylesheet" />
<script type="text/javascript">
var _viewer;
var _thumbs;
// Initialize Web Viewing
$(function () {
try {
// Initialize Web Document Viewer
_viewer = new Atalasoft.Controls.WebDocumentViewer({
parent: $('#_containerViewer'),
toolbarparent: $('#_toolbar1'),
serverurl: 'wdv',
allowannotations: true,
forcepagefit: true
});
_thumbs = new Atalasoft.Controls.WebDocumentThumbnailer({
parent: $('#_containerThumbs'),
serverurl: 'wdv',
allowannotations: true,
viewer: _viewer
});
loadFile();
} catch (error) {
appendStatus("Thrown error: " + error.description);
}
});
function loadFile() {
_thumbs.OpenUrl($('#FileSelectionList').val(), '');
}
// Show status and error messages
function appendStatus(msg) {
var stat = $("#status");
stat.append(msg + "<br>");
}
</script>
</head>
<body>
<h1>Atalasoft ASP.NET Core Web Viewing Sample</h1>
<form id="WDVForm" runat="server">
Select File to display:
<select ID="FileSelectionList" onchange="loadFile();">
<option value="images/Test.tif">Test.tif</option>
<option value="images/Test.pdf">Test.pdf</option>
</select>
<div style="width: 900px;">
<div id="_toolbar1"></div>
<div id="_containerThumbs" style="width: 180px; height: 600px; display: inline-block;"></div>
<div id="_containerViewer" style="width: 710px; height: 600px; display: inline-block;"></div>
</div>
<div id="status"></div>
</form>
</body>
</html> We need to change the server from "HTML" to "IIS Express"

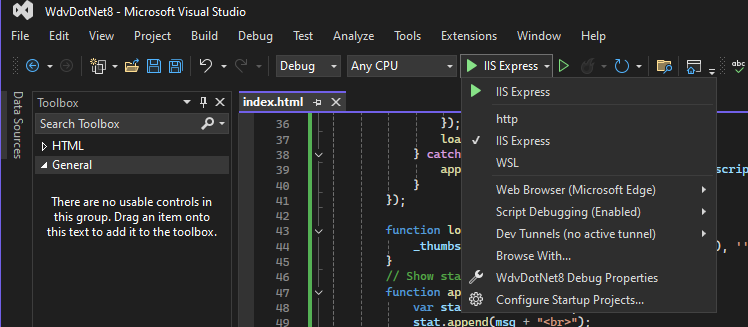
If all has gone well, you should now be able to run the solution and will see this on startup:

COMING SOON:
We will be fleshing out this section soon with an example where we build off the previous to add our WebCapture (WingScan web based scanning). The extremely abbreviated version of this until then is
wwwroot folder, add a new folder called atala-capture-uploadwwwroot folder add a new folder called WebCaptureC:\Program Files (x86)\Atalasoft\DotImage 11.5\bin\WebResources\WebCapture into there (if you didn't install the SDK and just want the resources, get them from DotImage_ClientSide_Web_Resources.zip� - unzip that and the files in question will be under WebCapture)wwwroot folder, add a new empty folder named atala-capture-uploadindex.html page to add (in the header section after the Scripts for Web Viewing and before the Style for Viewer: <!-- Script for WebCapture -->
<script src="lib/WebCapture/atalaWebCapture.js" type="text/javascript"></script> <div id="scanDiv">
<p>
Select your scanner and click the scan button...
the file will be uploaded to /atala-capture-upload/ with a unique filename
(the filename will appear in the status below)
</p>
<p> </p>
<p>
Select Scanner:
<select class="atala-scanner-list" disabled="disabled" name="scannerList" style="width:22em">
<option selected="selected">(no scanners available)</option>
</select>
<!-- DO NOT USE <input type="button" class="atala-scan-button" value="Scan" /> -->
<input type="button" id="scanNOW" value="Scan" onclick="scanWithSelectedScanner(); return false;" />
</p>
</div> <script type="text/javascript">
function scanWithSelectedScanner() {
Atalasoft.Controls.Capture.WebScanning.scanningOptions.scanner = $('.atala-scanner-list').val();
Atalasoft.Controls.Capture.WebScanning.scan();
}
// this is a really simplified error handler for now. We will expand on this later
function scanErrorHandler(msg, params) {
alert(msg);
}
</script> var _viewer;
var _thumbs;
// Initialize Web Viewing
$(function () {
try {
// Initialize Web Document Viewer
_viewer = new Atalasoft.Controls.WebDocumentViewer({
parent: $('#_containerViewer'),
toolbarparent: $('#_toolbar1'),
serverurl: 'wdv',
allowannotations: true,
forcepagefit: true
});
_thumbs = new Atalasoft.Controls.WebDocumentThumbnailer({
parent: $('#_containerThumbs'),
serverurl: 'wdv',
allowannotations: true,
viewer: _viewer
});
loadFile();
} catch (error) {
appendStatus("Thrown error: " + error.description);
}
});_viewer: //Initializes web capture
Atalasoft.Controls.Capture.WebScanning.initialize({
handlerUrl: 'wcs',
onUploadCompleted: function (eventName, eventObj) {
if (eventObj.success) {
// for this demo we are just going to notify the user of the filename uploaded
// in your app you may want to take additional action. eventObj.documentFilename will have the name of the file that got uploaded
//document.getElementById('resultDiv').innerHTML = "Status: Upload Success... " + eventObj.documentFilename;
appendStatus("Status: Upload Success... " + eventObj.documentFilename);
//alert('atala-capture-upload/' + eventObj.documentFilename);
_thumbs.OpenUrl('atala-capture-upload/' + eventObj.documentFilename, '');
}
},
onScanError: scanErrorHandler,
scanningOptions: { applyVRS: false, pixelType: 0, showScannerUI: true }
}); var _viewer;
var _thumbs;
// Initialize Web Viewing
$(function () {
try {
                    //Initializes web capture
                    Atalasoft.Controls.Capture.WebScanning.initialize({
                        handlerUrl: 'wcs',
                        onUploadCompleted: function (eventName, eventObj) {
                            if (eventObj.success) {
                                // for this demo we are just going to notify the user of the filename uploaded
                                // in your app you may want to take additional action. eventObj.documentFilename will have the name of the file that got uploaded
                                //document.getElementById('resultDiv').innerHTML = "Status: Upload Success... " + eventObj.documentFilename;
                                appendStatus("Status: Upload Success... " + eventObj.documentFilename);

                                //alert('atala-capture-upload/' + eventObj.documentFilename);
                                _thumbs.OpenUrl('atala-capture-upload/' + eventObj.documentFilename, '');
                            }
                        },
                        onScanError: scanErrorHandler,
                        scanningOptions: { applyVRS: false, pixelType: 0, showScannerUI: true }
                    });
// Initialize Web Document Viewer
_viewer = new Atalasoft.Controls.WebDocumentViewer({
parent: $('#_containerViewer'),
toolbarparent: $('#_toolbar1'),
serverurl: 'wdv',
allowannotations: true,
forcepagefit: true
});
_thumbs = new Atalasoft.Controls.WebDocumentThumbnailer({
parent: $('#_containerThumbs'),
serverurl: 'wdv',
allowannotations: true,
viewer: _viewer
});
loadFile();
} catch (error) {
appendStatus("Thrown error: " + error.description);
}
});app.Map("/wdv", wdvApp => { wdvApp.RunWebDocumentViewerMiddleware(new WebCaptureDotNet6.MyWdvCallbacks()); });to
app.Map("/wcs", wcsApp => wcsApp.RunWebCaptureMiddleware())
    .Map("/wdv", wdvApp => { wdvApp.RunWebDocumentViewerMiddleware(new WebCaptureDotNet6.MyWdvCallbacks()); });
It is our hope that you've been following along with the tutorial and have successfully built your solution. However, if you've run into issues or if you want a working reference app, we've implemented the WdvAspNetCoreSample three separate times. Once with manual clientside package install, one with bower packages and one with npm packages.
older files
In many respects we have barely even scratched the surface of the WebDocumentViewer and WebDocumentThumbnailer. This paper was meant as a very basic getting started that will serve you well as a step by step guide to just getting the viewer set up and working under ASP.NET Core. Atalasoft support engineers use a very similar base "boilerplate" app that we used as our inspiration for this demo nearly every day .. as a quick test harness / repro base solution to quickly test customer cases/issues and to test out various coding ideas having to do with WDV/ WDT.
In order to keep this document to a manageable size, we will end here for now. There are plans in the works for more advanced tutorials.. all of those will focus on the starting apps we've done here.
v06 - 2025/04/08 - TD
2025-06-18 - TD